 |
Family History
Wines Photography Books |

|
|
|
Site Contents Wine Tastings Wine Books Book Awards
|
Sunbreak Cellars - Time To Plant!By now, I was just waiting to get the cuttings so that I could plant. In late April of 2003, I got an email from Maury Island Vineyards:
I checked the area that we had landscaped a few months ago. Some of the soil had settled and I noticed that, by adding a bit more topsoil, I could reduce the slope on the terraces a bit more to decrease the rate of soil erosion further as well as continue to add some better soil to improve the planting area a bit more. So, over a one week period, I added about half a cubic yard of topsoil. As we were going to plant the vines in the final resting spots, I needed to make decisions now about the actual spacing of the vines in the rows. Based on where the trellis poles had been located, I had four rows to work with. The two short rows were each sixteen feet in length between the end posts. One row was forty-six feet in length with spacing of fifteen, sixteen, and fifteen feet. And the final row was twenty-one feet long with spacing of eleven and ten feet between the posts. Somewhere in the planning process, I had lost some of the planting space that I had originally counted on; that is, if I planted approximately three feet apart and took into consideration where the trellis poles were located, I could now plant only thirty-one vines instead of the forty vines that I had expected. With my expected yield, I was not going to get enough grapes. I needed to find a way to plant more and simply decreasing the spacing between the vines wasn't going to be enough. Fortunately, I had a solution and it was all due to the removal of the photinia hedge over the last winter. The space that the hedge had taken up was about fifty to sixty feet long. It was at the foot of a tall rockery that, in the summer, just baked in the afternoon sun so we’d be able to keep the retained heat up. The only downside to this space was that it is right along the sidewalk in front of the house. Our folly would be visible to all of our neighbors. However, I was deeply into this project and so this was simply unavoidable. I installed four more posts with sixteen foot spacing. This allowed me to plant another fifteen vines which meant that I could plant up to forty-six vines altogether across both planting areas – if all went well, I may be able to get ten gallons of wine from the grapes! I had one final activity in order to be ready. In order to make sure that the vines could grow straight up, I wanted to install at least the first wire of the trellis. This would make it easier to help keep the vines in a straight row by simply looking vertically down to pick a spot to dig the hole for each vine. This was a more straightforward process than I thought it would be; in fact, the hardest part was keeping the huge fifty pound spool of 12-gauge wire untangled as I stretched it between the posts. We placed the first wire approximately twenty inches above the ground; this is somewhat less than the 24-30 inch height that is typical in warm climates. The local rationale for staying closer to the ground is that the ground retains a little bit of extra heat which will help the grapes ripen better. We'll see in two or three years.
Over the next hour, I picked Jeff’s brain to learn as much of the planting process as I could in case there was anything unusual to consider. It seemed straightforward; be extremely gentle and bury the roots as deeply as possible. By 11:30am, I was back in Seattle and starting the planting process in a gentle drizzle throughout the day – perfect Northwest weather that would help keep the roots moist. I quickly found myself in a steady rhythm as I moved back and forth across the hill.
By the time I was done with the main planting, I had about two dozen extra cuttings. I carefully placed them into a couple of large cedar planters so that I could use them as spare vine replacements in the likely case that some of the cuttings would perish in the first year or two. About half of these were put into one-gallon containers to make them easier to pull out to move if I needed to. Then, I turned on the drip irrigators to make sure that the new vines and cuttings had plenty of water in their new home.
In my reading on viticulture, I had learned that one of the factors that negatively impacts the growth of the young vines is if they have to compete with weeds. In order to minimize such competition, I decided to cover the planting rows with a black weed block fabric. I cut small holes for the vine cuttings to stick through and then stretched the fabric over the planting area to cover as much space on either side as I could. I'll still have to check the areas where the grapes are growing but the vast majority of weeds will find it much harder to get established. There was a second reason for the black fabric -- much of the research seemed to show positive effects of using a black mulching plastic to help retain heat and moisture in the soil. I figured that this little bit of additional help wouldn't hurt and the extra effort wasn't that significant.
Then, I placed a single bamboo stake next to each vine and installed temporary 'grow tubes' over each wine. The bamboo stake will make it easier to train the young vines to grow vertically and the grow tubes will help retain a bit of extra heat until the summer really gets warm in June. It will also protect the young vines from accidental damage. View some of our grape vine pictures as the vines grow. Then, I was done! I'll probably over-water the cuttings for the first week or two to make sure that the new roots could get settled and then I'll start to cut back so as to stimulate root growth. In the first year, the most important thing for the future growth of the vines is to get the root system established as deeply as possible.
Read about the rest of the background behind our vineyard. This description will be updated as we achieve each next level. (The current chapter is listed in red.)
|
| ||||||||||||||||||||||||||||||||||||||||||
|

| ||||||||||||||||||||||


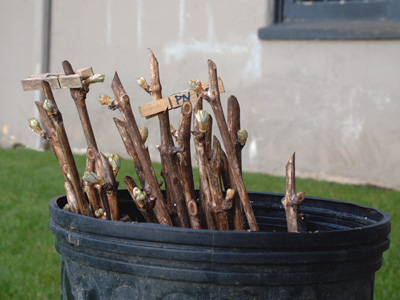 I was now ready. At 8:15am on Sunday, May 4th,
I found myself on the Seattle-Vashon ferry with a bucket and a box to pick up
the cuttings and one-year old vines. The cuttings, which looked like twigs, came in bunches of twelve
(see the picture at right),
tied together with a bit of string. The roots were barely visible at the dirt end –
there weren’t many on each cutting and they were really, really delicate. We put
them into a bucket with an inch or two of dirt at the bottom so that the new
roots would have at least a little padding.
I was now ready. At 8:15am on Sunday, May 4th,
I found myself on the Seattle-Vashon ferry with a bucket and a box to pick up
the cuttings and one-year old vines. The cuttings, which looked like twigs, came in bunches of twelve
(see the picture at right),
tied together with a bit of string. The roots were barely visible at the dirt end –
there weren’t many on each cutting and they were really, really delicate. We put
them into a bucket with an inch or two of dirt at the bottom so that the new
roots would have at least a little padding.